

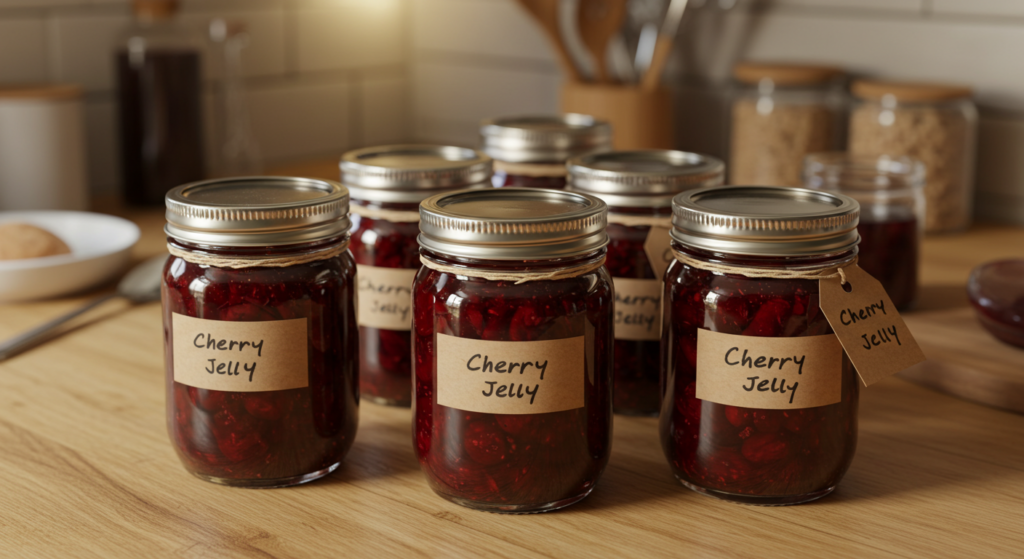
Preserving Summer vibes : How to Make Cherry Jelly at Home
Cherry jelly is more than just a condiment; it’s a delightful preserve that encapsulates the vibrant essence of summer in every jar. Imagine spreading a luscious, ruby-red jelly on warm toast, the sweet-tart flavor dancing on your taste buds, or using it to elevate a simple cheese platter into a gourmet experience. Whether you’re a seasoned canner or a curious beginner, this cherry jelly recipe will guide you through crafting a delightful treat that can enhance your breakfast, complement savory dishes, or serve as a delicious filling for desserts.
In this comprehensive guide, we will explore the ins and outs of making cherry jelly, including essential tips, variations, and the nutritional value of the ingredients used. We will also address common challenges faced during the canning process and provide solutions to ensure your jelly turns out perfectly every time. From selecting the right cherries to understanding the science behind the gelling process, let’s dive into the world of cherry jelly!
Key Aspects of Cherry Jelly Recipe
Making cherry jelly is more than just mixing fruit and sugar; it’s a delicate process that requires understanding the key components that contribute to its flavor and texture. Here are some essential aspects to consider:
The Importance of Ingredients
- Cherries: The heart of your jelly, cherries should be fully ripe to ensure maximum flavor and sweetness. Sour cherries are often preferred for their tartness, which balances well with sugar, but sweet cherries can also be used for a milder jelly. When selecting cherries, look for plump, firm fruits with a deep color. Avoid any that are bruised or overly soft.
- Sugar: Sugar is not only a sweetener but also plays a crucial role in the gelling process. It helps to preserve the jelly and enhances the overall flavor. In traditional recipes, granulated sugar is the standard choice, but alternative sweeteners can also be used for variations.
- Pectin: This natural thickening agent is vital for achieving the desired jelly consistency. Liquid pectin is commonly used in cherry jelly recipes for its ease of use and quick setting properties. Knowing how to work with pectin is essential; it’s important to add it at the right moment during cooking to ensure the jelly sets properly.
- Lemon Juice: Adding a splash of lemon juice not only enhances the flavor but also provides acidity, which is essential for the gelling process. The acidity helps activate the pectin and contributes to the overall balance of flavors in the jelly.
Equipment Needed
To make cherry jelly successfully, you’ll need the following equipment:
- Canning Jars: Use sterilized jars to prevent spoilage. Regular 250 ml jars are ideal for this recipe, but you can also use larger or smaller jars depending on your needs.
- Large Saucepan: A stainless steel saucepan is necessary for cooking the cherry mixture. Avoid using reactive metals, as they can alter the taste of the jelly.
- Jelly Bag or Cheesecloth: This will be used to strain the juice from the crushed cherries. A fine mesh sieve can also work if a jelly bag is unavailable.
- Canning Tools: A jar lifter, funnel, and magnetic lid lifter can make the canning process smoother and safer.
The Process of Canning
Canning is a method of preserving food by sealing it in jars and heating it to kill bacteria, yeasts, and molds. This process is crucial for ensuring the longevity of your jelly. The water bath method is a popular choice for preserving jams and jellies, as it provides a reliable way to create a vacuum seal.
- Sterilization: Before you begin, it’s important to sterilize your jars and lids. This can be done by boiling them for 10 minutes or placing them in a hot oven. Proper sterilization is essential to prevent contamination and spoilage.
- Water Bath Canning: This method involves submerging filled jars in boiling water for a specific amount of time. The heat destroys any microorganisms that could spoil the jelly and creates a vacuum seal as the jars cool.
- Cooling: After processing, jars should be allowed to cool undisturbed for 24 hours. This ensures a proper seal and allows the jelly to set completely.
Ingredients List
To make approximately 6 jars of cherry jelly, you will need the following ingredients:
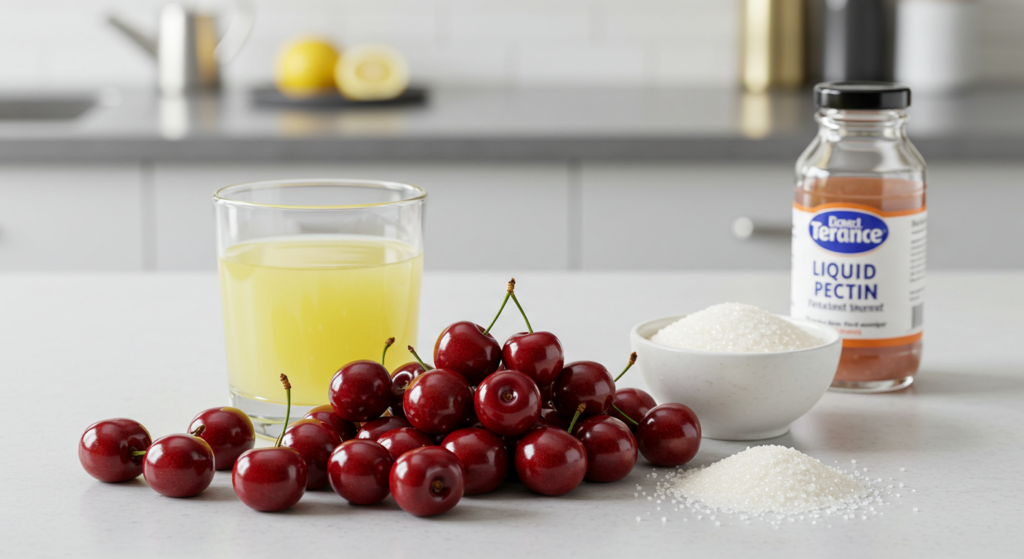
- 2 kg (4.4 lbs) fully ripe cherries
- ½ cup (125 ml) water
- 1 tbsp (15 ml) lemon juice
- 5 cups (1.75 kg) granulated sugar
- 2 pouches (170 ml) liquid pectin
Step-by-Step Instructions
Step 1: Prepare the Cherries
Wash and Drain: Start by thoroughly washing your cherries under cold water. Remove any stems or leaves, and drain them well. This step is crucial, as it ensures that any dirt or pesticides are washed away.
Step 2: Cook the Cherries
Combine and Boil: In a large stainless steel saucepan, combine the washed cherries with ½ cup of water. Bring the mixture to a boil over medium-high heat, using a potato masher to crush the cherries. This process releases the juice and flavors from the cherries.
Simmer: Once boiling, reduce the heat, cover, and let it simmer gently for about 35 minutes. Continue to crush the cherries occasionally to release more juice. The cherries should become soft and the mixture should be fragrant.
Step 3: Extract the Juice
Strain the Mixture: After cooking, pour the mixture into a damp jelly bag or cheesecloth-lined sieve set over a deep container. Allow it to drip for 4 to 6 hours, or overnight, to collect the juice. If you’re short on time, you can squeeze the bag for quicker results, though this may result in slightly cloudy juice.
Step 4: Prepare the Jars
Sterilize the Jars: While the juice is dripping, sterilize your canning jars. Place them in a boiling water canner and cover them with water. Heat to a simmer (180°F/82°C) and keep them hot until you’re ready to fill them. This prevents the jars from breaking when filled with hot jelly.
Step 5: Cook the Jelly
Combine Ingredients: Measure 6 cups of the cherry juice into a large saucepan. Stir in the lemon juice and all the granulated sugar. If desired, add ½ teaspoon of butter to reduce foaming. This step helps create a clear jelly without excess bubbles.
Boil: Over high heat, bring the mixture to a full rolling boil that cannot be stirred down. This is a crucial step in the jelly-making process, as it helps activate the pectin and achieve the right consistency.
Add Pectin: Stir in the liquid pectin and boil hard for an additional minute. Remove from heat and skim off any foam that may have formed. Skimming is important to ensure a clear jelly.
Step 6: Fill the Jars
Ladle Jelly: Quickly ladle the hot jelly into the sterilized jars, leaving about ¼ inch (0.5 cm) of headspace at the top. This space is essential for creating a proper seal.
Remove Air Bubbles: Use a non-metallic utensil to remove any air bubbles and adjust the headspace if necessary. This step is vital for ensuring that the jelly sets correctly and the jars seal properly.
Seal the Jars: Wipe the rim of each jar to remove any residue. Center a hot sealing disc on the jar rim and screw on the band until it is fingertip tight. This ensures that the lid will create a proper vacuum seal during processing.
Step 7: Process the Jars
Water Bath: Place the filled jars back in the canner, ensuring they are covered by at least 1 inch (2.5 cm) of water. Cover the canner and bring the water to a full rolling boil before starting the processing time.
Timing: For altitudes up to 1000 ft (305 m), process the jars by boiling for 10 minutes. If you live at higher altitudes, consult a canning guide for adjusted processing times.
Step 8: Cool and Store
Remove and Cool: After processing, remove the canner lid and wait for 5 minutes before removing the jars. Place them upright on a protected surface and let them cool undisturbed for 24 hours. Do not retighten the screw bands during cooling, as this can prevent a proper seal.
Check Seals: After 24 hours, check the seals. The lids should curve downward and not move when pressed. If any jars have not sealed properly, they can be refrigerated and used within a few weeks.
Nutritional Value
Here’s a nutritional analysis of homemade cherry jelly based on the ingredients used:
| Nutrient | Amount per Serving (1 Tbsp) |
|---|---|
| Calories | 50 |
| Total Fat | 0 g |
| Sodium | 0 mg |
| Total Carbohydrates | 13 g |
| Sugars | 12 g |
| Protein | 0 g |
*Note: Nutritional values may vary based on specific brands and measurements used.
Benefits of Cherry Jelly
Health Benefits
- Rich in Antioxidants: Cherries are packed with antioxidants, which can help reduce inflammation and support overall health. The vibrant red color of cherries is indicative of their high anthocyanin content, which is beneficial for cardiovascular health.
- Low in Calories: When enjoyed in moderation, cherry jelly can be a low-calorie treat that satisfies your sweet tooth without the guilt. Using it sparingly can allow you to enjoy the sweet flavor without overindulging in sugar.
Versatile Uses
Cherry jelly is not just for spreading on toast. Here are some creative ways to use it:
- Glaze for Meats: Use cherry jelly as a glaze for roasted meats, such as chicken or pork, to add a sweet and tangy flavor. The jelly can be brushed on during the last few minutes of cooking for a beautiful, shiny finish.
- Dessert Topping: Drizzle it over cheesecake, panna cotta, or vanilla ice cream for a delightful finish. The bright color and sweet flavor make it an attractive garnish.
- Cocktail Mixer: Incorporate cherry jelly into cocktails for a unique twist on classic drinks. It can be mixed with spirits like bourbon or vodka for a refreshing beverage.
- Cheese Pairing: Serve cherry jelly alongside a cheese platter. Its sweet-tart flavor pairs beautifully with creamy cheeses like brie or goat cheese.
Overcoming Challenges with Cherry Jelly
Common Challenges
- Jelly Not Setting: If your jelly doesn’t set, it may be due to insufficient pectin or an incorrect cooking time. Follow the recipe closely and ensure you’re using the right type of pectin. If your jelly remains runny, you can reprocess it by adding more pectin and boiling it again.
- Cloudy Jelly: Squeezing the jelly bag too hard can result in cloudy juice. Allow the juice to drip naturally for the clearest results. If you do end up with cloudy jelly, it’s still safe to eat, but the presentation may not be as appealing.
- Sealing Issues: If jars do not seal properly, ensure the rims are clean before applying the sealing discs. Retightening bands after cooling can also lead to seal failure. If jars fail to seal, refrigerate them and consume within a few weeks.
Solutions
- For jelly that doesn’t set, you can reprocess it by adding more pectin and boiling it again.
- To avoid cloudy jelly, be gentle when squeezing the jelly bag and give it ample time to drip.
- Always check seals after cooling and use a pressure canner if necessary for low-acid foods.
Future Trends in Canning
The art of canning is experiencing a resurgence as more people seek to preserve seasonal produce and reduce food waste. Here are some trends to watch:
Health-Conscious Preserving
As consumers become more health-conscious, there’s a growing demand for low-sugar or sugar-free preserves. Exploring alternative sweeteners can lead to innovative jelly recipes that cater to various dietary needs. Additionally, the use of organic or locally sourced ingredients is becoming increasingly popular.
Sustainable Practices
Sustainability is becoming a key focus in food production. Home canning aligns with this trend by allowing individuals to utilize excess fruits and vegetables, thus reducing waste and promoting self-sufficiency. Many home canners are now focusing on preserving heirloom varieties of fruits and vegetables, which not only supports biodiversity but also creates unique and flavorful preserves.
Educational Resources
As interest in home canning grows, so does the availability of educational resources. Online courses, workshops, and community classes are becoming more common, providing aspiring canners with the knowledge and skills they need to succeed. Social media platforms are also being utilized to share tips, tricks, and recipes, creating a supportive community for home canners.
Tips and Tricks for Perfect Cherry Jelly
- Use Fresh Ingredients: The fresher your cherries, the better the flavor of your jelly. Look for fully ripe, blemish-free cherries for the best results. Local farmers’ markets often have the freshest produce.
- Temperature Control: Ensure your jars are hot before filling them with jelly. This helps to create a proper seal and prevents breakage during processing. Also, be mindful of the temperature when boiling; too high can lead to rapid evaporation of liquid.
- Experiment with Flavors: Don’t hesitate to mix in other fruits or spices, such as cinnamon or vanilla, to create unique flavor profiles. Combining cherries with other berries can also enhance the complexity of your jelly.
- Labeling: Always label your jars with the date and contents. This helps you keep track of freshness and ensures you use older jars first.
Variations and Adaptations
Cherry jelly can easily be adapted to suit various dietary preferences:
- Sugar-Free Cherry Jelly: Substitute granulated sugar with a sugar alternative like stevia or erythritol, ensuring to follow the product instructions for proper gelling. Keep in mind that the flavor may vary slightly depending on the sweetener used.
- Mixed Fruit Jelly: Combine cherries with other fruits, such as raspberries or blueberries, for a delicious mixed fruit jelly. The combination of flavors can elevate your jelly and make it more unique.
- Spiced Cherry Jelly: Add spices like cinnamon or cloves during the cooking process for a warm, spiced flavor. This can be particularly delightful during the fall and winter months.
FAQs
How do you make cherry preserves?
To make cherry preserves, you would typically use the whole fruit, along with sugar and lemon juice. Cook them down until they reach a desired consistency, and then process in jars. Preserves tend to have a chunkier texture compared to jelly.
Can I use frozen cherries for this jelly recipe?
Yes, frozen cherries can be used. Just ensure they are thawed and drained before proceeding with the recipe. Frozen cherries may release more juice, so adjust the sugar accordingly.
How should I store my cherry jelly?
Store jars in a cool, dark place. Once opened, keep the jelly in the refrigerator and consume it within a few weeks. Properly sealed jars can last for up to a year.
What if my jelly doesn’t set?
If your jelly doesn’t set after the initial processing, you can reprocess it by adding more pectin and boiling it again. This is a common issue that can be easily resolved.
Can I customize my cherry jelly?
Absolutely! Feel free to experiment with different flavor combinations, such as adding other fruits or spices to create a unique jelly that suits your taste preferences.
Conclusion
Making cherry jelly is a rewarding experience that allows you to capture the taste of summer all year round. With this comprehensive cherry jelly recipe, you now have all the tools and knowledge needed to create a delicious preserve that will delight your taste buds and impress your guests.
Don’t forget to share your jelly-making adventures in the comments below! If you enjoyed this recipe and want more delicious content, consider subscribing to our newsletter for the latest updates and tips.